Copyright Notice

© Copyright 2023 Brenda Swenson retains copyrights to all images (artwork and reference photographs). All images on this site are property of Brenda Swenson and may not be used in any way for commercial, financial or personal use without written consent. Brenda Swenson retains all rights to republication (printed and digital) and anything but personal viewing of artworks. www.SWENSONsART.net

Tuesday, December 11, 2012

Plein Air Magazine


Plein Air Magazine Dec-Jan issue
My sketchbag
I am excited to share I am  featured in the current edition of Plein Air Magazine!
A few months ago I was contacted by the editor Steve Doherty and asked if I would like to share how I work on location with watercolor? Of course, my answer was YES! After a few email back and forth we arranged a time for the phone interview. A week later I received the draft of the article. I made additional comments, and sent digital images of my sketches from Praque, Germany, France and Italy.

A selection of my many sketchbooks
A few days ago I received the printed version of the magazine. It is top rate: high quality paper, good color... Steve is also a painter so he has a good approach to writing that is clear, informative and interesting. When I read the article I felt he kept my "voice" in it. Not a bunch of that gibberish you often see.

What a treat it is to share my watercolor sketches and illustrated travel journals. In the printed version of Plein Air Magazine I have four pages, but the digital version is expanded to have two additional pages of my sketches. If you are interested in a copy you can purchase it at Barnes & Nobles, or subscribe to the Plein Air Magazine.

Happy Sketching!
Brenda


Tuesday, November 20, 2012

Attitude of Gratitude


Dear Fellow Artists and Friends,
We are entering the holiday season. Commercials bombard us with images of the perfect family (healthy and happy). These images can misdirect our hearts and minds and leave us with feelings of sorrow. We are not in a perfect world and no family is left untouched by sorrow, grief, pain, illness… I am no different.
This last year has been filled with its “Highs & Lows”. I am blessed with an art career that is successful (teaching, shows, publications…), a new granddaughter, a new kitchen, wonderful friends, a loving husband and family. I also have had my lows. My son Daniel was diagnosed with Hodkin’s Lymphoma, my Dad and Step-Dad both had cancer this year, my tiny grandson was hospitalized, and I am still struggling with a disc problem in my neck. I can be thankful that Daniel has a good chance of beating cancer, both my Dads are in remission, and grandson has recovered.

Before we get lost in the busy-ness of the season I want to share a quote with you. It is hanging in my studio. It is a wonderful reminder that there is very little in life we have any control over except our attitude. I choose to have an Attitude of Gratitude...and pray!

ATTITUDE   
by, Charles Swindoll
 “The longer I live, the more I realize the impact of attitude on life. Attitude, to me, is more important than facts. It is more important than the past, than education, than money, than circumstances, than failures, than successes, than what other people think or say or do. It is more important than appearance, giftedness or skill. It will make or break a company... a church... a home. The remarkable thing is we have a choice every day regarding the attitude we will embrace for that day.
We cannot change our past... we cannot change the fact that people will act in a certain way. We cannot change the inevitable. The only thing we can do is play on the one string we have, and that is our attitude... I am convinced that life is 10% what happens to me and 90% how I react to it. And so it is with you... we are in charge of our attitudes.” 

Happy Thanksgiving!
Brenda

Wednesday, November 7, 2012

Pomegranate Collage Demonstration


I love the feeling of being in the middle of a painting and things are spread out all around my studio...I am in my element! The business of being creative gets messy sometimes. I like creative chaos. I just finished a stained paper collage. I thought it would be fun to share the collage process in its stages.

I stain/paint a lot of papers with watercolor. This takes time so I usually set aside a day to do this. I stain the paper with primary, secondary colors and neutrals. I line the floor with paper towels. I lay the painted papers on the floor to dry. 

The Japanese papers are commonly known as Mulberry, Unryu, Washi Paper. Do I have a favorite paper...no. Do I have resource... no. I just buy papers when I find something that interests me. Some papers are transparent and others opaque.  I suggest you do a word search for the papers I listed above and see where you can purchase some.

I draw the image on a 300lb piece of watercolor paper. I begin by blocking in the image with the stained papers. I use acrylic matte medium to adhere the papers to the watercolor paper. In the beginning the images looks rough but it is only the early stage
I have covered about half the watercolor paper with pieces of stained papers. I block in the large shapes first and tear the stained papers to get desired shapes. When I come up against small shape I’ll lay the Japanese paper on top of my drawing and use a wet brush to draw an outline. The paper will tear in a more controlled manner along the wet line. The collage paper should overlap the edges of other papers. The entire surface of the watercolor paper needs to be covered with collage.

Before I begin painting I need to unify the surface of the collage. I use a 50/50 mixture of matte medium and water. I painted the mixture over the entire collage and allowed to air dry before I begin painting.

The technique of painting on a surface that is covered with acrylic matte medium is very different than a traditional watercolor. The surface does not have the same absorbency as watercolor paper. The amount of water mixed with the paint and on the brush is decreased. All professional grade watercolors work for this technique.

I use the technique of negative painting to suggest more leaf shapes in the background. If you are unfamiliar with negative painting use the "Search" bar to the right to read past posts on the technique

In the final stage I added additional collage leaves on the lowest pomegranate, cast shadows.

© Copyright, Brenda Swenson retains copyrights to all artwork. All images on this site are property of Brenda Swenson and may not be used in any way for commercial, financial or personal without prior written consent. All Rights Reserved for republication (printed, digital or painted) and anything but personal viewing of artworks on this site.  

Friday, November 2, 2012

Daniel


Thank you for all the emails, prayers and good wishes. Here is the up-date on my son, Daniel.

Daniel and his great sense of humor!
October 11th, Bone Marrow Biopsy
October 16th, PET/CT Scan
October 18th, Test Results  
The lymphoma has not moved past the diaphragm or into the bone marrow. This is great news because it means the cancer has not gone into his organs or bones! Praise the Lord!

At out-patient they inserted a PICC line. This is like a permanent IV so that he doesn't have to get stuck for every treatment. The PICC line starts on the inside of his right upper arm and travels all the way up the arm, across the chest, and ends right above the heart. This way, when the chemo drugs are delivered they are right next to the heart that can immediately pump them throughout his system. The PICC line also protects from multiple veins collapsing through new IV inserts or blood draws. They can actually draw blood through his PICC line as well. The procedure took about an hour. Daniel will need chemo therapy every 2 weeks for 6 months.

October 23rd, Chemo Begins
He was at the doctors for 6 hours. When he got home he was exhausted. He had something to eat and mostly slept. The next morning his efforts to go to school were well-intentioned but he was just too fatigued to make it out the door. He crawled back in bed and slept until 11. He basically felt cruddy for 4 days. He slept a lot, said food tasted slightly metallic, had a difficult time focusing.

Daniel, Heidi Joshua and Nevaeh
October 28th, Feeling better!
Today Daniel and Heidi brought their daughter Nevaeh before the congregation. She was dedicated, and will be baptized when she is old enough to make a conscious decision of what it means to be a Christian.

Heidi is a wonderful daughter–in-love! I love her beyond words and I am so thankful for the bond we share. She is the perfect mate for Daniel and an amazing mommy to two tiny children. Joshua is 17 months, and Nevaeh is 4 months old.

The family has many prayer concerns and I am passing along their list.

1) Complete healing with little to no side effects along the way.
2) Daniel is attending Cal Poly to be a Mechanical Engineer. Energy to finish school work and wisdom to know when to put the books down.
3) No sickness (it's very easy to catch the flu with no immune system).
4) Patience with our babies.
5) Taking our stress to the Lord and not out on each other.
6) Critical illness insurance approval (they have received all documents and approval is pending).
7) Acceptance into cancer financial assistance programs (Leukemia & Lymphoma Society and The Beckstrand Cancer Foundation).
8) Wisdom in navigating the insurance claims and bills.

All of you who have been so faithful to pray for us, the Lord is listening and honoring your prayers. Thank you!

Please know I haven’t departed from my art related posts. I have something special to share and I will have it posted in a couple days.

Brenda

Monday, October 15, 2012

Sketchbook Snob


I admit it...I'm a bit of a sketchbook snob. I have been sketching for so many years that I've become very set in what I like or maybe more importantly...what I don't like. 
I use two different types of sketchbooks. The first one is a spiral bound book I make. This sketchbook is 10 x 11inches and has watercolor, pastel and drawing paper. You can read an earlier blog post to learn more about this sketchbook. But right now I want to talk about my other sketchbook, my illustrated journals.

Recently I was contacted by a company and asked if I'd like to try their sketchbooks. I like to keep an open mind but I have been disappointed with samples before. Within a couple days I received a box filled with a generous assortment of sketchbooks from Michael Kalman, at Stillman & Birn. I opened the books and felt the different paper surfaces. Each book was unique unto itself but I was especially taken with the Beta Series, Cold Press, 180lb. paper! The book was stitched bound and opened completely flat…and the perfect size 8.5 x 5.5, which means it opened to 8.5x11.inches. It
came in natural white (Beta Series) or ivory (Delta Series). This sketchbook got my hopes up!

I was getting ready to take a trip up north to see my son in Trinidad.  I tucked the new sketchbook away and decided I would play with in on the trip. You can read about the trip and see my sketches in my last post "Bitter with the Sweet". I was able to tuck the sketchbook in my purse along with my small travel palette, pen and waterbrush.
Last week I really put the Beta sketchbook to the test. Most sketchbooks can handle pen and a light wash of watercolor but this book can handle a lot. I am more than impressed!! The sketch of
the pomegranates shows how well the paper held with multiple wet washes without warping, pilling up, or bleeding through. I highly recommend the Beta or Delta Series for watercolor! The books come in a variety of sizes, bindings and paper surfaces. My favorite is the Beta 8.5 x 5.5. Stillman & Birn's focus is on the paper, point blank.
They recognize sketching is an art form, and the sketchbook is no longer just a transitional tool from the field to the studio, it's becoming its own form of fine art. 

They have created the highest quality sketchbook. 

To find a  retailer near you click Stillman & Birn. To see the NEW hardbound "Beta Series"  5.5 x 8.5 or 8.5 x 11 click here.

Happy Sketching!
Brenda


Wednesday, September 26, 2012

The Bitter With the Sweet


Trinidad Memorial Lighthouse
Buoys in the yard

It's always better to start with the sweet...so here I go.

Sweet
A couple weeks ago my youngest son Daniel and I made a trip to Northern California to spend time with my oldest son Thomas. It was supposed to be two short flights but when our second flight was canceled we decided to rent a car and make the final leg of the journey. That six-hour drive became a road trip that Daniel and I will remember for a long time. Both of us lead busy lives and it had been a while since we had time alone together.  Daniel is attending school full time at Cal Poly to become a mechanical engineer, works part-time and has a wife and two very young children (15 months and 12 weeks). 
 
One of the objectives of this trip was for me to have time with my sons but more importantly time for brothers to be together. On Saturday Thomas took Daniel fishing on his boat. While they spent the day out at sea I spent the day on shore sketching. On Sunday the guys cleaned and filleted fish while Lisa (Thomas's girlfriend) and I went for a walk at Patrick's Point State Park.  Lisa works at the State Park and is a wealth of information...she pointed out edible mushrooms, berries, rock formations, animals and all sorts of birds. When we got back I sketched at the house.

Thomas and the King Salmon

That evening the guys made a wonderful dinner. Lisa and I added to the table by making a boysenberry pie with berries picked in the yard. On Monday morning Thomas took us for a tour the harbor in his boat. Afterwards we packed a lunch, the two dogs (Pixie and Petie) and drove to the Trinity River. Lisa and I sat on the shore while the guys went fishing. Thomas caught a 10 pound King Salmon. It was beautiful to watch him rock the fish back-and-forth in the water. This forced fresh water and air though its gills. Once revived Thomas pointed the fish upstream and released it. On Tuesday Daniel and I made our trip home and return to life as normal... or at least we thought. 
Bitter
While fishing along the Trinity River Daniel got into poison oak. The itching was enough for him to make an appointment with his doctor. During the examination Daniel asked about a lump he had recently felt on his neck. This led to a series of tests and surgery. Yesterday he was diagnosed with Hodgkin's Lymphoma. You may ask why am I telling you this? I believe in the power of prayer. God does not waste anything.  I am asking you to hold up Daniel, his wife Heidi, and their two children Joshua and Nevaeh. Of course we are praying for God's healing but also for his strength, grace, and mercy as we go through this as a family.

Bitter and Sweet
Life can have a bitter sting but most days are filled with the sweet goodness of those around me and God's endless love and grace.
Heidi and Daniel
Thank you,
Brenda

Friday, August 17, 2012

Sketching Technique with Watercolor, DVD

Great news...my long awaited DVD is here. The response has been wonderful and I am more than excited to have this new teaching tool. 

Here is the description of the DVD:  Sketching Techniques with Watercolors DVD with Brenda Swenson. "There is a very playful element to sketching," Brenda Swenson says in the introduction to her latest DVD entitled Sketching Techniques With Watercolor. "When I start a large painting I tend to get serious…so sketching with watercolor to me is a lot lighter and fun filled".
 
Sketching Techniques With Watercolor is comprised of nine chapters beginning with sketching tools and techniques and continuing through to sketching and painting a vignette, a flower bouquet and a church landscape. Learn how a sketch can be complete in itself, or a road map to larger studio paintings. Whether you want to improve your skills, create travel journals or take that next step as an artist, you will come away excited and inspired. This 126 minute DVD is loads of fun for a beginning artists, as well as, a great refresher course for the intermediate painter.

Brenda Swenson, a popular instructor and author, has compiled many sketchbooks that she continues to use as reference material. "I discovered early on in life, that I didn’t really see something until I drew it. The more I sketched and painted, the more I became aware of the world around me. I found that even the simple things in life took on a new importance and beauty."

If you like a copy it is available at Cheap Joe's Art Stuff. 
Here's the title and link: "Sketching Techniques with Watercolor".

Happy Sketching!
Brenda

Tuesday, August 7, 2012

Sketching in Paris

In June I departed for three weeks in France. The first part of my adventure was in Paris.

Our first day we flew from Los Angeles directly to Paris. We arrived at 10:30 a.m., took a taxi to our apartment, went grocery shopping, set up house...Each day we explored a different district in Paris. Here is a selection of my sketches from my time in Paris.
By our second day we were getting tired. We had kept a pretty steady pace since we got off the air plane. Today we covered over 6 miles on foot by lunch time. We both prefer to explore cities on foot. When I think of all the places I saw in one day...wow!
One of the most beautiful sights in the center of Paris is the Pont Alexander III Bridge. The gold gilded sculptures were brilliant in the sunshine. It is also a great place to people watch. A couple dressed in their wedding attire being photographed, gypsies trying to con tourists, artists...
On Saturday I said good-bye to Paris and flew on to the South of France. My workshop was located in the small village of Limoux located along the Aude river.
Participants in the workshop stayed in the beautifully restored residence of Montfaucon. It is located along the Aude River, only 5 minutes from the center of the village.  


I unpacked my art supplies, went grocery shopping, and set up house (again). Once settled in my new apartment I met up with participants in my workshop. 

Dinner was prepared by chef, Jean-Francois. The food was as beautiful as delicious. As they say food is meant to delight the eyes and palette!
Stay tuned...

Happy Sketching!
Brenda

Friday, July 20, 2012

California to France and Home Again

I am feeling a bit guilty for not updating my blog since I returned home from France. As we all know life has a way of redirecting our time, energy and talents. I am no different.

To start off my husband decided to do a complete kitchen remodel while I was in France. We spent two months making plans. He planned to knock out two walls, move a door, remove two windows... We selected tile for the floors and back splash, counter tops, cabinets, lighting...  he also decided it would be a good time to replace the carpet in the entire house!!! I spent two weeks prior to my trip packing the house.

On June 19th I was off to Paris. I was so excited to spend four days in Paris doing nothing but sketching, eating fine food, sightseeing, relaxing... A girl friend and I had a lovely apartment in the Montmartre region. We  covered a lot of ground in just a few short days. The summer days are long and it doesn't get dark until 10:30 at night. I sketched  during the day and wrote in my travel journal at night. I hope to share these sketches soon.
On Saturday the 23rd it was time to pack-up and catch a flight to the South of France. I spent the next two weeks with a group of people from the U.S. I was the instructor for a watercolor workshop. Every day we packed up our supplies and head out to sketch and paint. The quantity and quality of work the participants did was great! I worked hard too. I was up before 5:30 a.m. and rarely shut my eyes before midnight. During the day my attention was on my students so I had to use the evening to finish my pieces. I hope to share these sketches with you soon.
I returned home from France on July 7th. This is when life got complicated. When my husband picked me up at the airport I noticed his left hand. In his haste to corner one of our cats (the day the carpet was installed) he was bit. His hand instantly swelled and the doctor put him on a antibiotic. It was two days later and I could tell it wasn't working. The next morning he went to urgent care and they put him on a I.V. with a very strong antibiotic. For four days he was hooked up to the I.V. The good news is his hand is looking normal again.

While in France I was blessed with my first granddaughter. Her name is Nevaeh. She is 7 pounds, 13 ounces. I was torn with the news...excited at her arrival but sad I wasn't there to greet her. A short time after I arrived home I got a chance to know her a lot better. She has a 13 month old brother named Joshua. Early one morning I received a call from my son Daniel. Joshua had been in the emergency room since 3:00 a.m. He was being transported to another hospital by ambulance. Little Nevaeh now needed me to care for her. Daniel and Heidi rotated shifts staying with Joshua day and night so he would never be alone. They did a great job! The best news of all is Joshua was released from the hospital. It was a virus that made him so ill. He is gonna be okay!!!
Now back to the kitchen....it is almost finished. It has been 6 weeks since demolition and they are making quick work of it. The guys are downstairs working in the kitchen and it wont be long before I can do dishes in the sink again (instead of the bath tub). The good news is the kitchen is BEAUTIFUL!

I am still unpacking boxes and I imagine this will go on for a while. But my family is safe and sound, I had a wonderful adventure in France and I will soon be back in my studio happily painting away.

Happy Painting!
Brenda

Wednesday, May 23, 2012

The Perfect Sketchbook


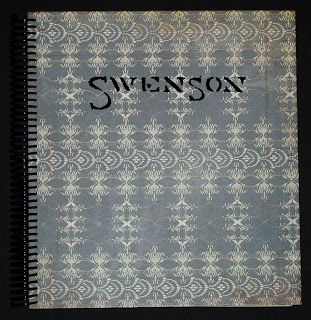
My Finished Sketchbooks
I have come to the decision that The Perfect Sketchbook...is one I make. I like stitched bound sketchbooks for travel and journals but for an all around workhorse I like my own best! Listed below are the papers and the sizes I use.
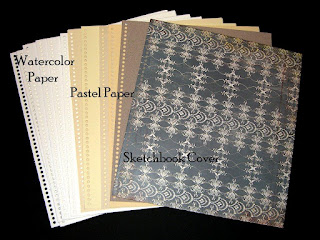
Watercolor Paper
3 Sheets of 22x30
I like an assortment of 140lb.  Saunders: Bockingford & Waterford (Cold Press, Hot or Rough)

(available at Cheap Joe’s Art Stuff, (800) 227-2788 www.cheapjoes.com)

Toned Papers
8 pieces of pastel paper (11x10)
I use Mi-Teintes by Canson. I prefer creams, grays, and sepia tones. The paper comes in pads or larger sheets. Mi-Teintes can be found at most art supply stores.

Drawing paper
4 pieces of white drawing paper (11x10)

Simple Cover & Backing
For a simple cover and backing have spiral bound at an office supply store (Kinko’s, Staples, Office Max…). They provide a light weight cover, backing, and spiral.

---------------------------------------------------------------------------
If you want to get creative with the cover...here's what I do.
Additional Supplies for Decorative Cover
 
1 Piece decorative paper for cover.
Paper should be at least 1 inch larger than sketchbook size. A good resource for decorative papers is scrap booking stores. Papers that are thin should be avoided (tissue or Japanese
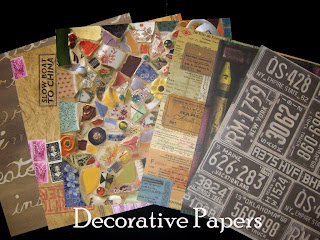
 paper). 

1 piece 11x10, 140lb watercolor paper
1 piece 10½X9½, 140lb watercolor paper
1 piece 11x10 stiff backing for back cover. I use thin illustration board, or mat board.

Miscellaneous items
Yes! Paste
Stiff brush for paste
Bone folder or burnishing stick


Directions
Place 11x10 watercolor paper on top of decorative paper (12x11). Cover watercolor paper with a light coat of Yes! paste. 
Turn watercolor paper over and burnish down with bone stick. 
Trim 4 corners as seen in picture.

Use paste on 4 flaps, fold over, and burnish down with bone folder.
Cover 10½X9½ watercolor paper with a light coat of paste and mount on top of cover (backside). This gives the inside cover a clean look and extra strength.


 Selection of papers in my sketchbook. The papers where punched with a spiral binder (picture taken before spiral was put on). Spiral binding is available at most office supply stores (Kinko’s, Staples, Office Max…).
 

Make a sketchbook fit your own needs. Use any brand of watercolor and drawing paper you like and any size you like. 
Happy Sketching! 
Brenda

Tuesday, April 24, 2012

The Sketch Hunter


Prague, CZ


The “The Art Spirit” by, Robert Henri belongs in every artist’s library. It was first published in 1923 and is still being printed today. I want to share a passage from the book with you.

“The sketch hunter has delightful days of drifting about among people, in and out of the city, going anywhere, everywhere, stopping as long as he likes-no need to reach any point, moving in any direction following the call of interest. He moves through life as he finds it, not passing negligently the things he loves, but stopping to know them, and to note them down in the shorthand of his sketchbook. Like any hunter he hits or misses. He is looking for what he loves, he tries to capture it. It’s found anywhere, everywhere. Those who are not hunters do not see these things. The hunter is learning to see and to understand-to enjoy.”

When I first read this book it stopped me in my tracks. The pages of the book speak deeply to me. The passion and emotion of all artists transcends time!

I have filled countless sketchbooks. I have travel a lot with my sketchbooks. I travel to teach, sketch, and explore. I want to see and understand my world. When I sketch I see, I understand. These books contain my life- joy, sorrow, achievements... and all that life has thrown me. I am a sketch hunter!

Happy Sketching!
Brenda

Wednesday, April 4, 2012

Reflective Color in Shadows

Often I see students reach for a tube of gray paint when they are describing shadows. What they don’t know is that shadows are where the most exciting color possibilities can be found. The illuminated area near an object reflects light into the shadows. This reflected light carries color with it. This is called reflected light.
To achieve a better understanding of shadows and reflected light, it can help if we can actually see it happen. I created the general shape of a building to demonstrate the point. Look at the photos of the building. I place the building on four different colored surfaces. Notice how the color of the shadows changed on the building, depending on the colored surface it is placed on. There are 2 kinds of shadows here (cast & form), and both are affected by reflected light.
Click on the picture to enlarge so you can really see the shadows.

The best teacher is seeing it for yourself. On a sunny day go outside and explore shadows. The only time you will see gray shadows is on a overcast day, and the shadows are very faint. The only time I see gray shadows is when the object is sitting on a gray surface (i.e. a building in a parking lot).

So next time you are painting REALLY look at the shadows before you reach for a tube of gray paint.

Happy Painting!
Brenda

Saturday, March 17, 2012

Negative Painting with Watercolor


 Negative painting is one of the most exciting approaches to watercolor I know! The technique is a unique approach of painting around an object to define it in a composition. When working in watercolor we have the challenge that other mediums do not. It is what we don’t paint that becomes the most important element. Think of yourself as a stone carver, chipping away, until only the most precious lights remains.  There are many techniques to saving the “lights” of the paper. I have experimented with masking fluids, tapes to save the “lights” but found the end result was either harsh or cutout looking. I preserve the “lights” of the paper from the very beginning by painting around them.
Opaque and Transparent


Opaque Paints (top row): Cadmium Yellow, Cadmium Red Light, and Horizon Blue.

Transparent paints (bottom row): Quinophthalone Yellow, Scarlet Lake, and Cerulean Blue.


It is best to avoid opaque paints (such as cadmiums) for negative painting. Opaque are fine for accent marks at the end but not for glazing. The technique requires numerous glazes which will become muddy with opaque paints. To determine if your paints are opaque or transparent do a simple test. With a permanent marker draw a bold line across a piece of watercolor paper. With paint the consistency of cream paints over the line. If the line is obscured at all it is opaque.

Learn more about paint characteristics by reading my post on the topic.
3 Colors for under-painting

 Underpainting: To determine which 3 colors I will use for the under-painting I make numerous color swatches. The swatches will contain a red, blue, and yellow. The colors do not need to be true primaries. When I mix the colors it is important to have the paint be the same consistence to encourage good mixing on the paper. I am looking for colors that have the underlying feeling of the subject matter. The 3 colors I selected are Carmine (C), Cobalt Teal Blue (CTB), and Raw Sienna (RS).

Step #1, Line Drawing: When I draw for a negative painting I am especially mindful of the space and shapes between the leaves and pomegranate (negative space). I want to have shape and size variety. I draw enough to get the general shapes. It is important not to over draw. Allow opportunities for additional shapes to be developed in the painting process.


Step #2: I wet the entire paper with clean water and introduce the 3 paint colors separately (Raw Sienna, Cobalt Teal Blue, and Carmine). I paint at an angle to encourage mixing as the paint runs down the paper. I don’t over work the surface with a paint brush but encourage the paint to mix on the paper. While the paper was still damp I lifted a little color off one pomegranate with a damp brush. Let thoroughly dry.


Step #3: Start glazing. I will add additional paint colors but I will use the 3 original colors through out the painting process. I consider these my “mother colors”. I paint hard edges against the pomegranate and some of the leaves, and soften edges with water as I move out from the subject. This is what I call the “adolescence of a painting”, because it looks and feels awkward. Let thoroughly dry.


Step #4: With each glaze I create new negative shapes and darker values. I sometimes soften edges with a light spray of water while the paint is wet. This technique is most evident on the bottom pomegranate where I used a brush saturated with Carmine to paint the lower section and quickly used a spray bottle to help move the paint down the paper. Let thoroughly dry.


Step #5: In the final stage I paint the darkest darks and smallest shapes. I use a rich deep green made with Marine Blue and Burnt sienna. While paint is still wet I drop a small amount of Scarlet Lake to the green mixture to liven it up. I am selective to place my darkest darks near my lights to intensify the focal area. I finish with cast shadows and a few details. 

Happy Painting!
Brenda


Step #5 Final step


Wednesday, March 14, 2012

Watercolor Paints: Understanding Opaque and Transparent

I am going to put on my teacher’s hat and talk about watercolor paints and their particular characteristics. The reason I am spending time on this topic is that I want to share information about "negative" painting, and it is necessary to understand opaque and transparent for this technique to work.

Transparent: permits light to penetrate. Allowing the white surface of the paper or underpainting to show through. These pigments are fine in texture. When multiple glazes of transparent colors are painted on top of each other (when dry) the color beneath will show through changing its appearance.


Opaque: impenetrable to light; not allowing light to pass through. These paints are relatively chalky in appearance when dry. All cadmiums are opaque.
 

Semi-Opaque or Semi-Transparent: These paints are “middle of the road”. These paints are generally safe for under-painting but not glazing techniques.

Opaque or Transparent how do you know?This information is available from manufactures and can be accessed in catalogs, art supply stores and the internet. I have spent a sizable amount of time collecting manufacture information. Not everyone has time or interest to do this research. The quickest and best way to determine if your paints are opaque or transparent is to do a simple test. With a permanent marker (Sharpie Chisel tip) draw a bold line across a piece of 2x2 inch watercolor paper. With paint the consistency of whole milk paint over the line. If the black line is obscured (chalky looking) it is opaque. On the paint swatch I write information (brand, color name, index code). I keep all my color swatches in a binder for future reference. Over the years I have built an extensive binder of color swatches. I am amazed how often I refer to this information. 


I don’t want to give the impression I am against using opaque paints… I like them but I don’t keep them on my palette as a main color. When I need an opaque color I squirt out some fresh paint. I do a lot of “negative” painting built up with glazes, and glazes get “muddy” with opaque paint. Opaque are great for accent marks at the end, but not for glazing. Glazing is when you paint a transparent layer on top of a dry layer. Opaque paints will look chalky or muddy if used for glazing. If you have a tendency to get “muddy” colors chances are you have an opaque paint on your palette.Look closely at the paint swatches below. 
Look at the top row and notice how the paint seems to be sitting on top of the line...this means opaque.
Look at the bottom row, notice how the paint does not effect the black line...this means transparent

 I encourage you to try this exercise with your current palette of paint. You might be surprise!

Happy Painting!
Brenda